Transform Business Collaboration Using Virtual Reality Technology
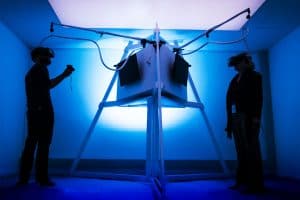
Virtual Reality (VR) may have begun as a niche gaming product, but its benefits have transcended into the business world. The technology is still evolving and will continue to seep into the mainstream as it becomes more widely adopted. Industries such as construction, manufacturing, retail, healthcare, entertainment and education are taking advantage of virtual reality’s ability to immerse users in realistic experiences. One of the most important applications of virtual reality is training simulations. Many enterprise applications are enabling workers to learn faster and retain information. Safety applications are helping companies train employees to reduce hazards and improve employee health. As the world becomes further connected through technology, VR enables companies to improve different customer and employee experiences. The result is greater customer engagement, employee satisfaction, additional revenue, and immense cost savings.
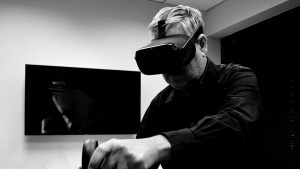
If the advantages of virtual reality interests you, you may consider building your own virtual reality application. While developing your first virtual reality application will require the expertise of a technology partner, we want to give you some insight into how to utilize one of the most popular VR headsets available today, the Oculus Quest.
The Oculus Quest is a powerful virtual reality headset developed by Oculus and supported by their parent company, Facebook. The Oculus Quest has a robust app store with hundreds of consumer VR applications. At Invonto, we develop enterprise virtual reality applications using the Oculus and HTC VR headsets. While there are many choices today for a VR headset; portability, relatively lower costs, and sufficient performance makes Oculus Quest a great choice for the business users. Invonto has been running VR Roadshow events with a series of interactive VR demonstrations using the Oculus Quest headset. Most people visiting one of our roadshow events found virtual reality technology very useful for the business applications.
Understanding capabilities of the Oculus Quest and its potential for enterprise VR apps can guide a company’s VR development strategy. In this post, we will discuss how your company can prepare to use the Oculus Quest for your own virtual reality applications.
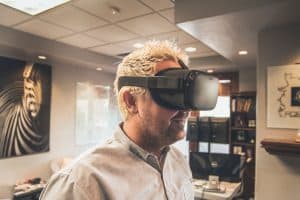
The Oculus Quest is a portable headset with hardware integrated in the headset. Unlike the Oculus Rift, this means no PC is required to experience a virtual reality app. VR app developers use the same VR technologies like Unity and Unreal Engine to create a VR application for Oculus Quest as the other popular VR headsets. Before you begin virtual reality (VR) app development, it is important to understand the hardware. Let’s take a look.
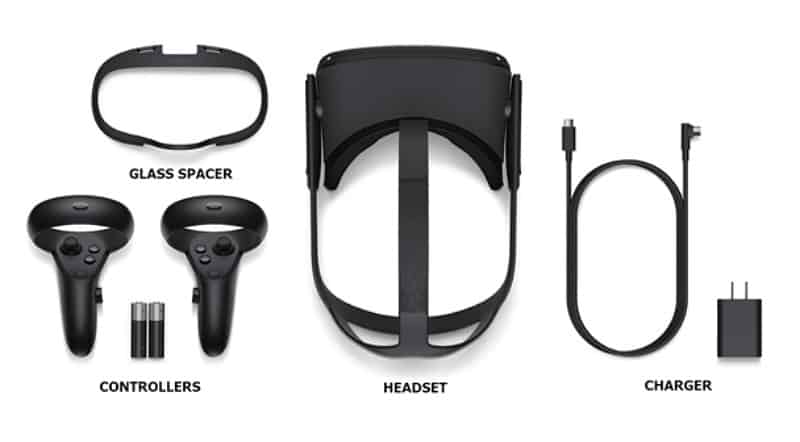
The Oculus Quest consists of a headset, a set of controllers, a charger, and a glass spacer. You will want to take some time to try out the headset and controllers to adjust for optimal comfort. The Oculus Quest headset has three adjustable straps (two on either side and one on top) that must be fastened to secure your headset in place. Follow these steps to secure your headset.
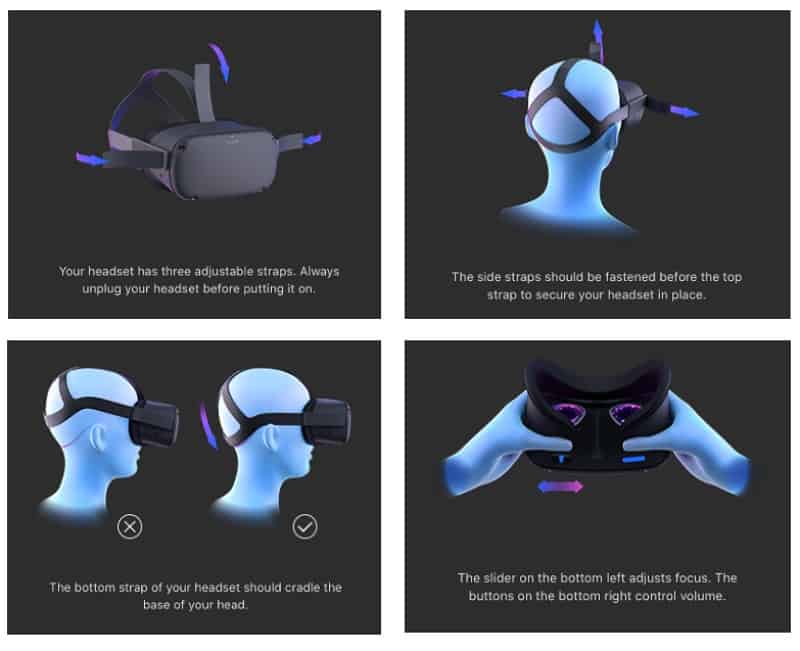
Should you need to adjust the headset view, use both hands to hold each side of your headset and slowly move the Oculus Quest up and down until the picture is clear. If the image is still not clear, you can use the slider on the bottom left of your headset to adjust the image quality.
The headset is accompanied by a pair of controllers. These controllers allow you to interact within virtual reality, even giving you virtual hands you can see while in a virtual environment. Use virtual hands in place of viewing standard controllers in the virtual reality environment. This provides more realistic experience while grabbing and interacting with different objects. The controller has standard control actions:
A fully charged Oculus Quest headset will allow up to 2 – 3 hours of play time. Ensure that you properly charge your headset between uses. The Oculus Quest controllers require AA batteries which must be replaced every few months depending on use.
If you intend on connecting your headset with a PC, you will need a USB-C to USB adapter or a USB-C to USB-A cable. These are not included with your Oculus Quest.
Oftentimes, you will need to demonstrate a virtual reality application to one or more viewers. A large digital display like a smart TV will allow you to cast your experience to the screen for others to view. To accomplish this, you will need a Google Chromecast device or a Chromecast-ready digital display.
The Oculus Quest includes a system called The Guardian. This boundary system is designed to display in-application wall and floor markers when users get near the user-defined play-area borders. When the user gets too close to the edge of a boundary, a translucent grid is displayed as a layer that is superimposed over the virtual reality game or experience. We will review how to set up The Guardian for an optimal virtual reality experience.
The Guardian lets you create boundaries in virtual reality that appear when you get too close to the edge of your play area. When setting up The Guardian, we recommend setting up a minimum of 6.5 ft x 6.5 ft play area.
When you set up The Guardian for the first time, you can follow the on-screen instructions.
If you’re setting up Guardian with your Oculus Quest for the first time, follow the on-screen instructions. There are two Guardians settings you can choose from.
Stationary Guardian
Use this guardian if you prefer experiencing virtual reality while sitting in a chair.
RoomScale Guardian
Use this guardian if you prefer experiencing virtual reality while standing. This will allow you to experience interactions that require walking around the space, sitting down, and bending.
Ensure proper flooring level when setting up Roomscale Guardian. Confirm the floor level but touch the floor with your virtual hands / controllers in the VR and sensing that the floor level in virtual reality and in your physical reality are about the same. This will provide you with the right ergonomic experience within the VR experience.
To reset your Guardian, follow these instructions:
As with any hardware, it is important to take care of your Oculus Quest. There are some general guidelines you should follow to ensure your Oculus Quest lasts a long time.
We recommend you keep the Quest out of direct sunlight to avoid damaging the lenses and display screen. If exposed to direct sunlight, your headset can experience permanent damage. Additionally, we recommend you keep the headset away from sharp objects to avoid scratching the lenses. When adjusting your headset or straps, you should be gentle to avoid damaging them. Never wear your headset while connected to the power adapter or while charging. When you aren’t using it, keep the Oculus Quest in a safe place away from pets, small children, heat sources, and food.
Oculus has an app store similar to Apple’s and Google’s app store. This is where you can find popular consumer Oculus VR applications like Beat Saber and Superhot. However, enterprise applications must often remain closed off to the public and are therefore not available through the Oculus Store. Instead, enterprise VR applications must be installed directly onto the headset.
To get started, register a developer account on the Oculus Developer Dashboard. Once you have registered your account, you can install the official Oculus app on your mobile device. The Oculus mobile app is available on both the Apple Store and Google Play Store. Open the Oculus app and sign in with your account information.
The next step is to pair the Oculus app with your Oculus headset. To do this, navigate to the “Settings” tab located at the bottom bar of the Oculus app. Look for and select the “Pair New Headset” option and select it. From the available options select “Oculus Quest”. Go through the in-app instructions to finish pairing your headset.
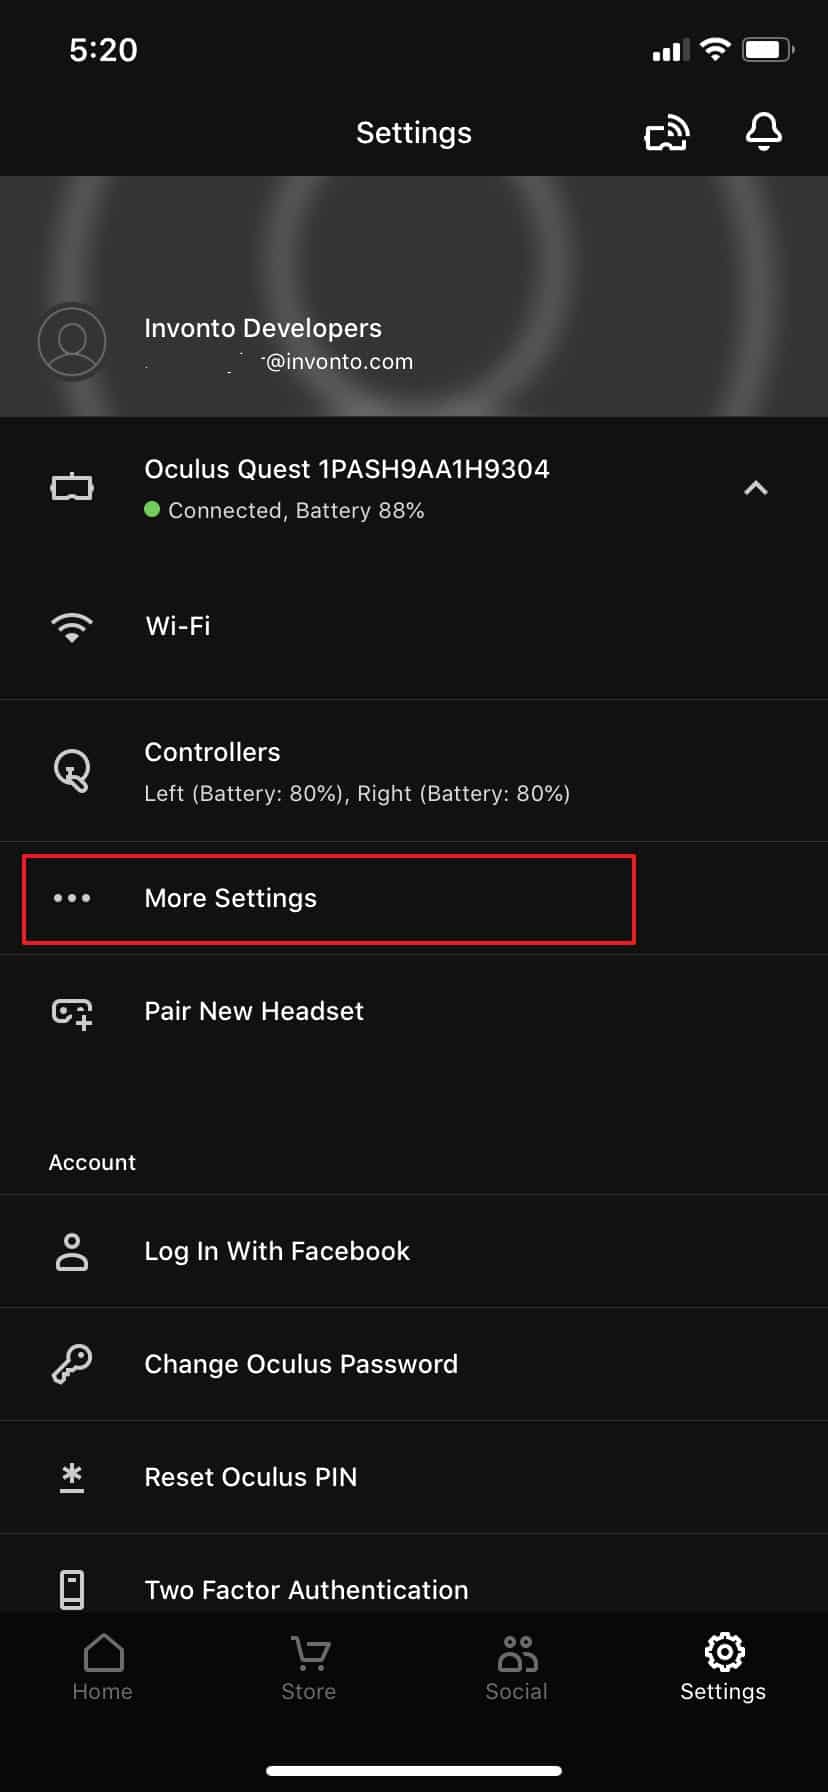
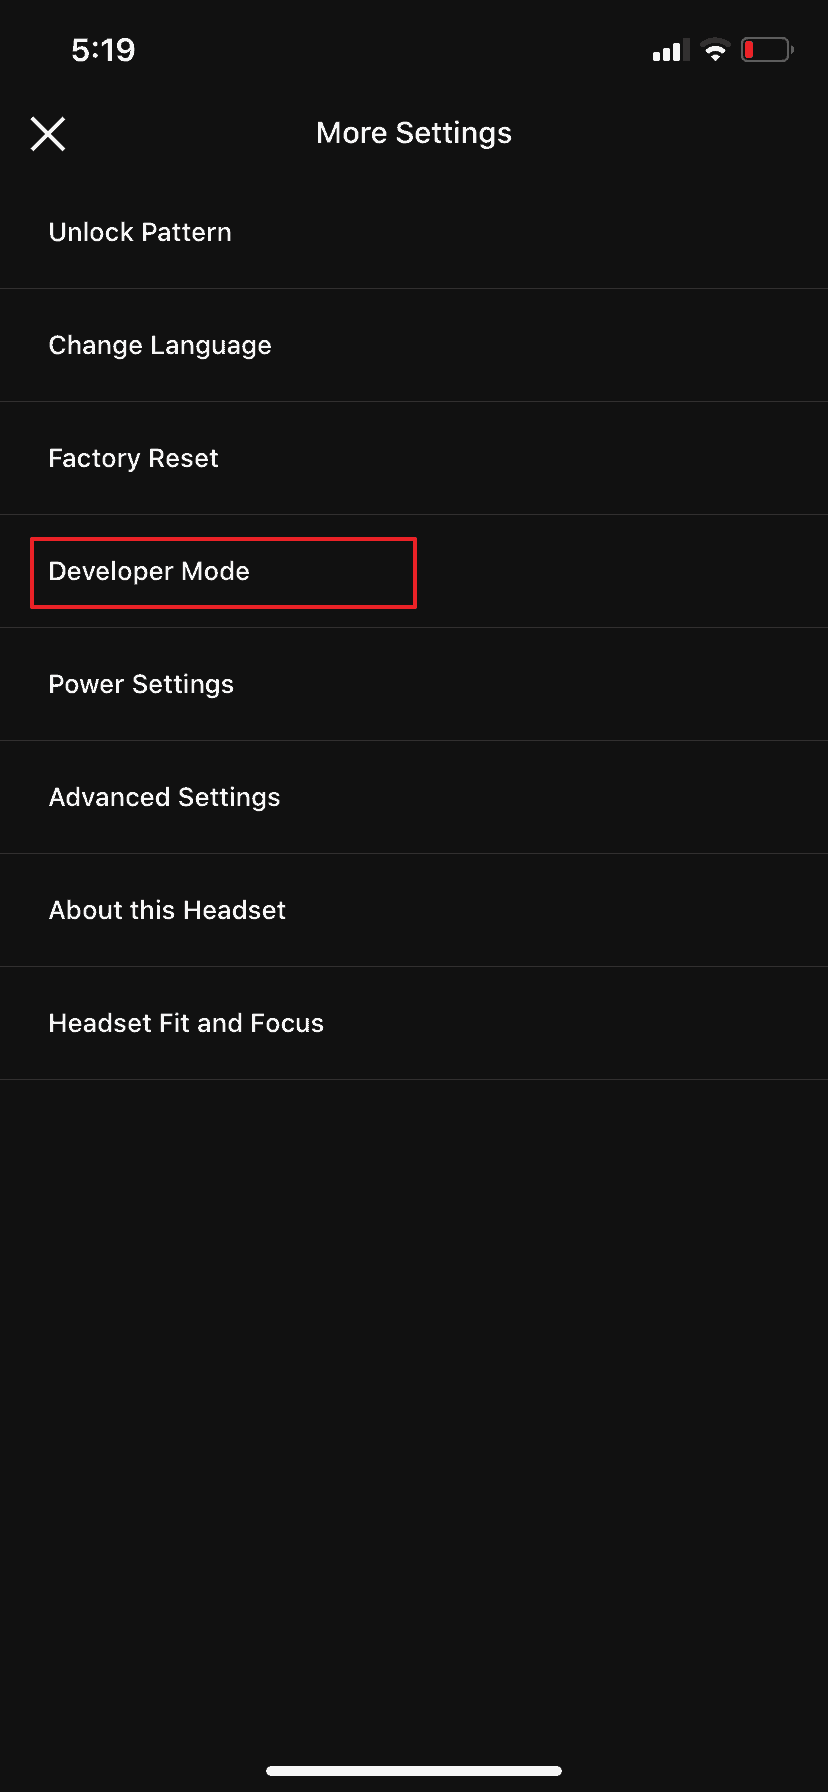

In order to install virtual reality applications outside of the Oculus Store, enable the Developer Mode. Within the Oculus app, click on the paired Oculus Quest headset icon and select “More Settings.” Select “Developer Mode” and toggle to activate Developer mode. Once completed, reboot the Oculus Quest.
SideQuest is a great platform that allows you to download an app or game that is not on the Oculus Store. The process is known as sideloading which can be complicated, but SideQuest keeps it simple. It is important to know that SideQuest does not tolerate pirated games. SideQuest is specifically designed to host virtual reality applications that may be early access builds or closed applications.
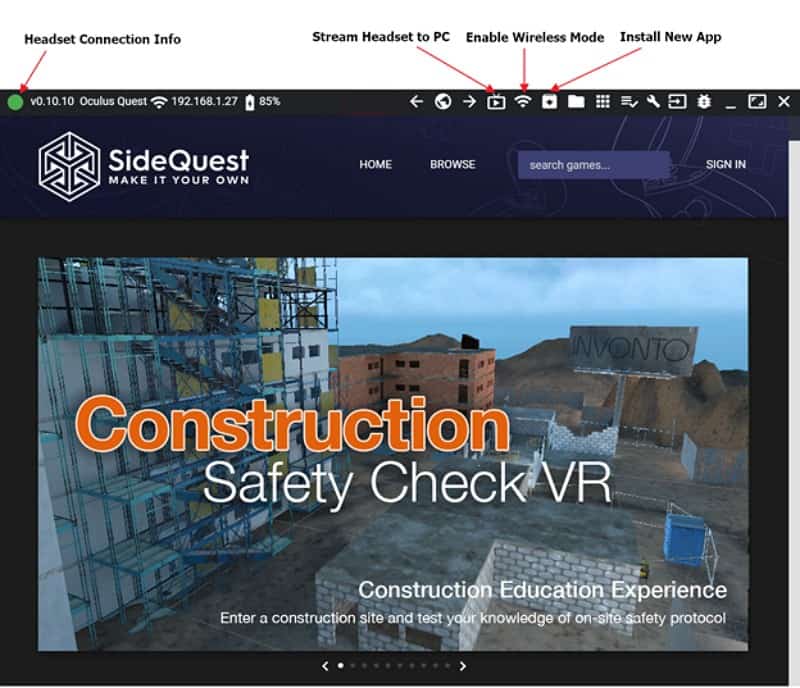
SideQuest is available on Windows, Mac, and Linux platforms. You can download the latest version using this link. Follow the on-screen installation instructions and launch SideQuest. Using your Oculus charging cable or a USB-C to USB adapter, plug in your Oculus headset into the PC. Once connected, allow debugging by approving a popup on the Oculus Quest headset viewer. Ensure the checkmark is selected for “Always Allow From This Computer.” If everything is working properly, a green dot will appear in the top left corner within the SideQuest application window along with the device’s IP address and battery level.
Now that we have installed SideQuest and connected it to the Oculus Quest, we can begin installing new virtual reality applications on the headset. Within SideQuest’s top bar, click on the down arrow icon to select “Install APK file from folder.” Your file browser window will appear and you can select the appropriate APK file from your local computer. Once SideQuest confirms that all tasks are completed, you can try the latest version of your virtual reality application.
You now have your virtual reality application installed and ready to use on your Oculus Quest. Oftentimes, you may desire to share your VR experience with others. To demonstrate your virtual reality apps cast the Oculus Quest to an external monitor or device.
As we mentioned earlier, in order to cast you must have a Google Chromecast-enabled monitor or a Chromecast device. If you haven’t set up Chromecast before then follow these instructions. You will need to install Google Home app on your phone for configuring your Chromecast device. Make sure that your Oculus Quest and Chromecast device are connected to the same Wi-Fi network.
If you would like to start casting to your TV or monitor, turn on the Oculus Quest headset. From the Universal Menu, select “Sharing.” From the “Sharing” menu, select cast and choose from the list of available devices. Select “Start” to begin casting your virtual reality gameplay to the external monitor. On your mobile device, select the notification to open your Oculus app and begin casting.
The Chromecast feature is still in beta. It is possible you may experience some difficulties. Currently, the devices that support Oculus casting are the Google Chromecast, Google Home Hub, and Nvidia Shield and Nvidia Shield TV. Certain TVs with built-in Chromecast may also support casting, but compatibility isn’t guaranteed on all models. Additionally, ensure your Oculus Quest and Chromecast devices are on the same Wi-Fi network and that your network allows PsP connections.
If you don’t have a Chromecast-enabled device available, you can cast to your PC using SideQuest. Before you begin, make sure that your Oculus Quest and PC are on the same wifi network. Then connect Oculus Quest to your PC and open SideQuest application on your PC. Once connected, select “Enable Wireless Mode”. A popup window will appear showing the device’s IP address. Verify the IP and click on the “Connect” button. Next, click on the “Stream From Your Headset To Your PC” which will open a popup window. Click on the “Start Stream” button to start casting your Oculus headset to your PC.
If a PC or a TV monitor are not available, you can still cast to your phone using the Oculus app. Open the Oculus app on your mobile device and select the casting icon on the top right side of your screen. Under “Cast From”, select the headset you would like to cast from. In this case, it will be the Oculus Quest. Under “Cast To”, select “This Phone”. On the bottom of your screen, select the “Start” button and put on your headset to accept the in-VR prompt to start casting.
A red dot in the upper right corner of your headset view will indicate that you’ve started casting. To stop casting from within the headset or from the Oculus app, select the back button in the top left of your casting screen.
From the bottom of the headset menu, select “Sharing”. From the Sharing menu, select “Cast”. Select “Stop Casting” from the in-VR prompt.
With your Oculus Quest ready, your virtual reality application installed, and casting enabled its time to demonstrate. Put your headset on and create a Roomscale Guardian with a 10 ft x 10 ft space. From the Oculus Quest home screen, click on “Library” using the Oculus controller. Select the “Unknown Sources” option and choose the application you would like to start. Have fun!
Virtual Reality (VR) has immense potential for companies across industries. Oculus Quest is one of the most popular VR headsets for enterprise VR applications. Understanding Oculus Quest’s capabilities and relatively lower costs can help companies benefit significantly from their VR initiatives. . We’ve helped companies create interactive VR environment and safety training simulationsusing Quest VR headset. If you are interested in virtual reality development, learn more about how Invonto’s VR app developers can help turn your VR vision into a realistic VR experience.