
How effective UX design process can produce high performance apps
In this part, we will create the Album list screen. We’ll see how to create tables, table rows, and how to show different type of data in the table view.
The WatchKit Table View (The Album list screen)
In iPhone and iPad development, it’s a core competency to be familiar with iOS table views and how they’re configured. So when you see that the table view also exists on the watch, tables of repeating rows of data, sometimes very simple, sometimes a bit more detailed, it is natural you would think about the likely similarities.
At very beginning, I was thinking the stuff like these: we would need a class to use as the data source for the table view. We’d have methods like “Number of Rows in Section,” and “Cell for Row at Index Path” to provide the individual data.We’d have a Delegate method ” did select row at index path” to respond to any selection, and some Code to dequeue reusable cells using a cell identifier. Alright, this is a good list for iPhone and iPad table views.
But this is just not the way how table view works in Watch App at all. Actually, it’s much simpler in the Watch App. And in fact, once I became familiar with how we create tables in WatchKit, I wish they were done the same way in regular iOS. There are no protocols to implement, there’s no delegation, we don’t even have the concept of a cell. Over into a basic Watch app with a single interface controller, there is one table control in WatchKit. It’s called the WKInterfaceTable. We can find it in the Object Library in the bottom right of the Xcode. Unlike conventional iOS development, there aren’t several different ways we might add a table, we don’t have special table-only versions of the interface controller, there are no other table-related controls in the Object Library, and of course, we can’t add any controls programmatically, so if we want to create a table in our Watch app, all we need to do is that just drag this exact control over into a screen, in the storyboard. Once you’ve added one, this is what you’ll initially see, this ONE table row entry as the screen shot. The table view doesn’t automatically take over the full interface. From top to bottom, just taking by default about the same space as a button. Definitely, the table view will grow because there’s no point in having a table if you only have one row. Another thing, we can also add other controls above or below if we want to.
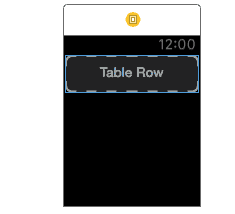
Table view will resize in height dynamically. They’ll be scrollable if there’s more content than fits on one screen. We just let it grow as much as it needs to. We also need to know that A WatchKit table view is always one column wide.It’s just one column of these repeating rows. What we need to do is to provide a few pieces of information.
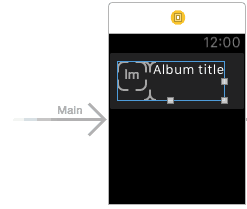
First, we need to define the table view row in the format we want.(includes UI elements like: Labels, separators, switches, buttons if you need to; display as: title and subtitle, image icon and title, etc.) When we dragged and dropped this table view we did get a default row, and it’s just an empty group waiting for us to add controls inside it. From the layout we can see that it’s simply a group. Defining a row is simply just an arrangement of other UI controls in this empty group.
In our Watch app album list screen, we will add the album cover image view and the album title label horizontally in this empty group of the row.
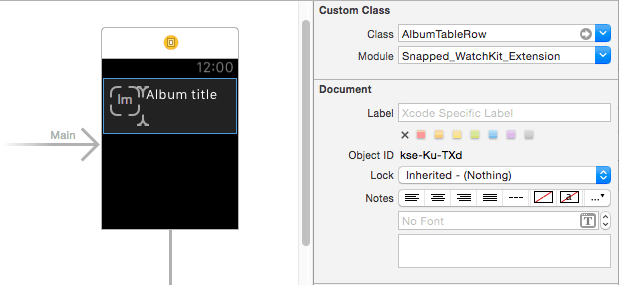
After finish the table view row format, we will need a custom class for this row so we can define outlets for the image view and title label and be able to reach in and change them in code. We couldn’t just control drag from these labels into the regular interface controller.Because there isn’t a one-to-one relationship between the image view and label and the interface controller because this row will be repeated, containing those image views and labels, and we don’t know how many times. So we will create a new class.
In the Snapped WatchKit Extension group, we create and open AlbumTableRow.swift file. The next thing that we need to do is connect these user interface elements to that custom code. Before we do this we need to change the Class to “AlbumTableRow” under the “Identity inspector” section in the Storyboard, and also give the Identifier in the the “Attributes inspector” section.
After we connect these user interface elements to that custom code, we will have these code in the AlbumTableRow.swift file.
/*********
import Foundation
import WatchKit
class AlbumTableRow: NSObject {
@IBOutlet weak var albumNameLabel: WKInterfaceLabel!
@IBOutlet weak var albumCover: WKInterfaceImage!
}
*********//
Displaying the table data
In the Snapped WatchKit Extension group, open InterfaceController.swift file and add the following separate method (every time if we need to refresh the table view, just call this method) to the class:

Here’s what’s going on in the above method:
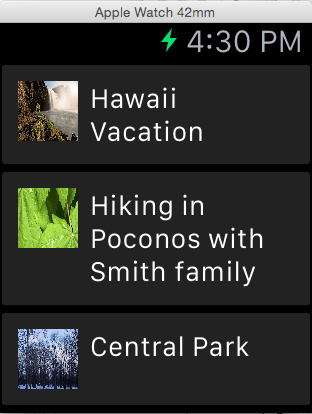
rowControllerAtIndex(_:) simply fetches the object for a particular row.Row succeeded, you set the cover images for the image view, and the title for the album title label.After we added the Watch App support to our Photo Sharing iPhone app, now we can also check the album list and photos in specific album from the Apple Watch App.(Check the screen shots)
This article is part of a series:
Summary of my Apple Watch App Development – Part1
Summary of my Apple Watch App Development – Part2